Information
Site Introduction
Welcome to dustforce.info!
This site was originally designed as a replacement for the tech pastebin, but aims to centralize the collective Dustforce knowledge in a single spot!
The site is currently in development and can be contributed to on Github: gonX/dustforce-wiki
Everyone is welcome to contribute, and we’re at the point where any content is better than no content - however please read CONTRIBUTING.md before submitting a pull request. Contributing unfortunately requires a Github account.
If you aren’t already, using Dustmod is highly recommended!
As this is more of an information center rather than a guide to the game, we highly suggest that you read czyys’ Dustforce guide which is linked in the list below.
- Leaderboards: dustkid.com
- Custom maps: atlas.dustforce.com
- Dustmod: dustmod.com
- Speedruns: speedrun.com/dustforce_dx
- Reddit: /r/dustforce/
- czyys’ Guide: czyys/dustforceguide
Dustmod
Dustmod is a drop-in replacement mod designed to enhance the original Dustforce experience, both in terms of performance, usability, as well as visuals.
A significant amount of newer custom maps use elements that are only available in Dustmod.
Some features include:
- Extended configuration options
- Extended leaderboard filtering
- Daily featured custom level
- Online multiplayer (2-4 players)
- Additional community nexuses (maps technically individually available on atlas without Dustmod)
- Replay ghosts
- Plugin framework
- Save file management
- Extended DirectX 12 and OpenGL support (Vanilla is DX9)
- TAS tools
Dustmod is closed source software created and maintained by msg555 with the original Dustforce DX source code provided pro bono by Hitbox Team.
For more information, please see dustmod.com
Point values on Atlas
On the official custom map hub, Atlas, the point system (which dictate your displayed “rank” on your Atlas profile page) are as follows:
- Making an account: 100
- Voting on a map: 10
- Commenting on a map: 40 (labelled as “answers”. Only includes top-level comments, not replies)
-
Replying to a comment: 0
- Making a map: 300 (labelled as “questions”. Does not include hidden maps)
- Receiving an “upvote”: 30 (3-5 hearts)
- Receiving a “downvote”: -10 (1-2 hearts)
(note, it seems possible to have received votes without having any maps. may be votes on hidden maps?)
Daily Algorithm
msg555 reports this on the Daily algorithm:
The pool of levels is all maps (visible or not) on Atlas that are not part of the CMP and have not been the daily before. It picks 5 maps uniformly at random from that set and chooses the one that has the most SSes. There’s nothing preventing a map with 0 SSes from being chosen.
Why do replays sometimes get a negative replay ID?
Negative IDs occur when using Dustmod and the replay wouldn’t have been saved by the vanilla client.
Examples include early exits and completions that aren’t PB’s.
Mechanics / Tech
Basics
Basic Game Mechanics
The basics of the game are that you have 4 directional keys for movement, a Dash, Jump, and a Light attack, and Heavy attack button.
Dust on surfaces act as collectibles that we must route to gather along our way.
Characters can jump or dash once in midair, downdash to rapidly begin falling, run up walls briefly, climb over ledges, jump and dash off of walls, slide or run along ceilings and slide on slopes.
Once your combo meter reaches 100, your character has charged up a “special attack” (aka super) which cleans dust on surfaces within line of sight, dustblocks and enemies around you in a limited range. (see Super)
Routing where to use Super(s) is one of the primary considerations we had to make when optimizing a level.
Attacks
Your attacks are multi purpose, both serving as combat tools for enemies, as extra reach for cleaning dust on surfaces, and as a mobility tool. Hitting an enemy or Dustblock in midair cancels your fall, and fully cleaning an enemy restores your aircharges allowing you to air-jump or air-dash again.
There are two types of attacks, with heavy attacks dealing 3 times as much damage and hitting a larger area, but their startup time is much longer and they can’t be chained as easily into followup attacks.
Additionally, enemies cleaned by a heavy attack as the final blow will spread dust on nearby surfaces based on the attack direction.
Your attacks can differ when performed in the air or on the ground, and different versions of the attack will be performed depending on your directional keys.
Each attack applies some time dilation only for the player (game time continues normally), and hitting enemies causes hitstop, thus to maximize time, it is almost always better to hit as many enemies in as few attacks as possible, including using the knockback of an attack to push an enemy towards another enemy to hit them both.
The 4 characters do have mechanical differences, and they greatly affect our choice for which is used at which points in the TAS. Their attack hitbox differences are shown to exact scale in this album (This album is for attacks on enemies only. Attacks on dustblocks and to clean dust on surfaces have some variable range based on the quadrant you are located in etc. The general sizes and shapes are still roughly what is shown in the album)
insert link to #hitboxes here
Terminology
(TYPE)boost
Gaining speed via impacting level geometry (groundboost, slopeboost, etc.) or abusing other mechanics (airdash boost/ADB, magnet hijack boost/MHB, etc.)
See Boosting
Light, Heavy
The two strengths of attack available to each character.
See Attacks in the Advanced section.
Super
The wide-area special attack usable only after the combo meter reaches 100.
See Supers
Empty Super
A fast super hitting no enemies, used to clean only surfaces and dustblocks.
See Empty super in the Supers card.
Seam attacks
Attacks can sometimes clean or spread dust via the “seam” between adjacent blocks.
See Seam Attacks
Time dilation
The way supers and attack startup slow the relative timescale for the player.
See Time Dilation in the Attacks card.
Time manipulation
Taking advantage of how time dilation subtly changes movement.
See Time Dilation in the Attacks card.
Land-cancel
Air downlights are automatically aborted shortly after landing on the ground.
This is briefly covered in the Dash Rhythm section of the Dashes card.
Early exit
Menuing and selecting “exit level” before the level finishes, but late enough that the level end triggers during the fadeout.
See Early Exit
Mouse exit
When exiting a level, clicking “yes” rather than navigating with the keyboard or controller sends the player directly back to the Main Nexus.
Cycle
Entity (ie. enemy) positions are calculated from when the entity was last loaded, which is indirectly influenced by the path (and time) taken through the level.
Aircharge
The counter tracking how many times a character can jump or dash in midair.
This is covered in the stats for the characters, but briefly put, all characters except Dustkid only has 1 air charge.
Air dashjump
A simultaneous dash and jump in the air with only one aircharge.
Ledgeclip
The game nudges the player up/down when approaching a corner from the side
See Ledge Clips
Slopejump
An instant startup ground jump from slope slide state.
Spikejump
A safe jump off of 45 degree spikes.
Walltap
Grabbing a wall for one frame or less to clean dust or reset x speed while falling.
Related reading would be Wall Grab in the Walls card.
Superdrop
Unrelated to actual Supers, this is the technique used for quickly cleaning dust (using light attacks) while falling at high speeds.
Left friction
An unintentional programming oversight causes air friction to be much more intense when travelling left.
See Air Friction
Updash
Avoiding friction by delaying a wallrun after dashing from a slope up a wall.
See Updashing in the Expert section.
Extended ceiling run/slide
The player can briefly remain in ceiling slide state mid-air after the ceiling ends.
See Ceiling Grab
Air walljump
After grabbing and sliding off a wall, the player can still walljump in midair.
See Air Walljump
Infinite walljump
Left friction allows for repeated jumps off left-facing overhanging walls.
Dyno
Walljumping and regrabbing the same wall by jumping at the point where it transfers from vertical to an overhanging slant.
Jorf
A small area near the edge of a spiked surface which can be touched safely.
See Jorfs
Mapler Slide
A technique to extend ceiling runs to retain speed for longer and/or travel farther.
See Mapler Slides
Droof
A technique to gain great horizontal speed by falling next to a right-facing slanted wall.
See Droofs
Taildash
A technique to rapidly turn around or gain a small amount of speed on a slope.
Slopesurfing
Technique used to dash on a slope but cancel the dash immediately.
See Slopesurfing
Raiserun
A tech that enters the wrong state when jumping, allowing an earlier wallrun.
See Raiserunning
Clip
Certain configurations of geometry allow the player to pass through solid walls.
Magnet
Jumping or dashing mid-air will “magnet” you to walls up to 42 horizontal units away (almost a full tile).
This is often negatively experienced for the first time for many players in Backup Shift (TODO: earlier levels?) However, it can also be used for positive effect as is often seen in the Walls (last) section of Giga Difficult.
Hitrise
When you damage (or kill) an enemy with an attack, your character rises ever so slightly.
This is often negatively experienced for the first time for many players in Mega Difficult.
See Hitrise
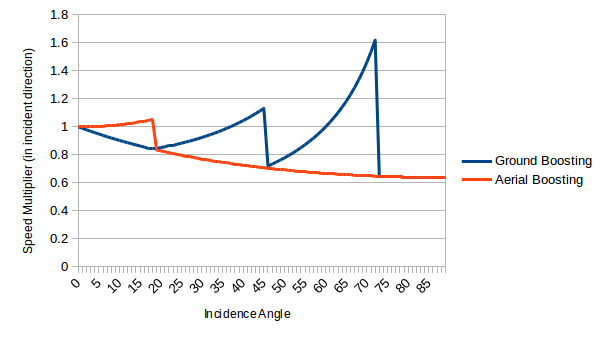
Boosting
Surface Boosting
When a character hits a surface, they lose some portion of their speed based on their angle of incidence as shown below, and the rest of their speed is converted to line up parallel with the surface they’ve run into.
This is used most frequently to convert falling speed into ground speed (referred to as Groundboosting for flat ground and Slant- or Slopeboosting when taking advantage of advantageous ground angles), but also applies to collisions with walls and ceilings.
Corner/Ceiling Boost
Boosting on a slanted or sloped ceiling by walljumping at the point where the wall and ceiling meet is often referred to as a “Corner Boost” and is a reliable way to get a fast ceiling boost.
When jumping from a overhanging slanted wall, the extra horizontal speed makes for an even faster boost. This is known as an “Access boost” (named after the stock map, Access).
Even without an advantageous slope it’s possible to get a boost on a ceiling, but the fact that you need to be moving upward rather than downward means that these sorts of Ceilingboosts generally aren’t as significant as other boosts, as the amount of upward speed we can get is usually very limited.
Wall Boost
The most common kind of Wallboost is when transferring a ground speed boost into a wall with the help of a slope or a slanted wall.
However, when jumping into a wall, jump timing and the resultant angle you hit the wall at can have a dramatic effect on your upward speed after the collision. Occasionally, it’s even possible to get a downward Wallboost when trying to fall quickly.
Parallel Boost / Fitboost
Lastly, though most boosts center around converting a high amount of speed in one direction into less speed in a more useful direction (e.g. fall speed to sideways speed), it’s also possible to get a “boost” by aligning your movement as closely as possible with a surface.
For example, if jumping upward at a 45 degree angle toward a 45 degree upward slope, it’s possible to land with a near-0 degree angle of incidence, keeping almost all of your total speed.
Once the ground levels out, this converts to about a 40% increase in horizontal speed.
Clipboost
When Ground-, Slant- or Slopeboosting, it’s sometimes possible to fall slightly past the surface in question and gain extra falling speed, then ledgeclip up onto it for a better speed boost than you’d normally be able to get from your initial height.
Ceilings
Ceiling Grab
Also known as “Ceiling Cling” or “Neutral Ceiling Run”
The first 10 frames are frictionless, allowing full speed conservation, this is increased to 15 frames as normal Dustman as mentioned in Dustman
Once friction has started to apply, releasing from the ceiling has a 10 frame delay, this occurs regardless of the ceiling tiles ending, so can be extended into midair, this is known as an “extended ceiling run/slide” or previously “air extended ceiling slide”.
Notably this ceiling run friction is frequently a smaller penalty to your speed than leftward air friction or, if travelling at an upward angle, gravity, so it is still intentionally used and saves time occasionally.
Ceiling Run
Started by holding up and forward. You can only ceiling run in the direction you already have velocity, so e.g. holding up and left will leave you in Ceiling Grab state if you have no sideways velocity or X velocity toward the right.
Sets you to 522 (all characters’ run speed) if your speed is less, and is frictionless for the first 20 frames.
Same rules for releasing the ceiling apply as with Ceiling Grab state. Air Ceiling Slides can be performed after either state so long as friction was applying.
Maplers
An advanced technique to preserve speed is by combining the frictionless frames of a ceiling grab together with the frictionless frames of a ceiling run.
This is called a Mapler slide
Dashes
When you dash, first your speed is converted to horizontal (possibly with some loss) if in midair, then if your speed is below your character’s dash speed it is increased to that value.
After these conversions occur, your velocity is locked in (barring collisions with surfaces) for the duration of the dash (12.5 frames, which due to subframe counts rounds up to 12 frames and 3 subframes under normal circumstances).
Dash Rhythm
When your character has a boost, dashing to lock the speed value is very important. Dash inputs will buffer for the remainder of the frame on which the input is sent.
Due to the input buffering, this allows a new dash to begin directly after the previous dash ends, even when that occurs on a subframe that normally does not accept inputs.
This is what we call “perfect dash rhythm” and results in a repeating sequence of 5 dashes.
This rhythm normally follows a 12-13-12-13-13 pattern due to the three subframes of spillover each dash.
If your dash input is processed on the first subframe, your dash will always begin at the beginning of the sequence.
If your dash input is buffered, you can start anywhere in the sequence, based on what subframe the dash started.
When you have an available air charge to use, buffering a ground dash is normally only possible if you would land within one subframe, as otherwise an airdash to occur.
If it’s not possible to buffer a dash or precisely time your landing, you may undergo up to 4 subframes of landing state friction before you can dash, significantly reducing your speed, though this can sometimes be reduced to 1 subframe through use of a land-canceled downlight. This means buffered or timed dashes are usually much preferred for keeping maximum speed.
Aerial Dash Boosting
When dashing in midair, if your speed vector angle before the dash is within 18 degrees of horizontal, in either direction, 100% of your total speed is transferred into the dash, giving you a horizontal speed boost.
This is known as Aerial Dash Boosting. When outside of this 18 degree range, you still keep a portion of your speed (1-[change in angle]/90°) so it’s still possible to airdash faster than normal dash speed when travelling at a sharp angle, but a significant amount of speed will be lost.
Deathzones
Touching a deathzone will cause you to respawn on your last checkpoint, if any, after FILLME frames.
If an enemy touches a deathzone, they get removed and the end result is the same as if you cleaned them.
(TODO: talk about Moon Temple any% checkpoint/deathzone thingy)
Friction
Air Friction
Applies when X speed is over 522, adjusts your speed based on how far away your X speed is from POSITIVE 522.
This results in significantly stronger speed penalties when moving left (at negative values greater than 522).
Ground Friction
Does not have the same left vs right issue that air friction has (thankfully)
Still applies when speed is over 522
Jumps
Ground Jump
When not in slopeslide state, a ground jump has 7.5 frames (rounding up to 7 frames and 3 subframes, like with dashes) of startup.
This startup will end immediately if the player would become airborne, leading to a “ledgejump.”
If the player is still holding jump when jump startup completes, the player gets a “fulljump,” if not then a “shorthop” will occur.
A shorthop normally gets slightly less initial upward velocity, and experiences significantly more gravity during the rising part of the jump.
At the start of the jump, your upward velocity is increased to your character’s jump velocity if it is less. However, if you already have more upward velocity (almost always because of a significant speed boost which you have transfered to an upward ramp), then you will instead keep your current Y velocity, even in the case of a shorthop.
When jumping from the ground, your total speed is converted to X velocity in the direction of the jump, then capped based on your new Y velocity.
This means that when travelling up or down slopes, you may gain some X speed because you no longer have the angle of the ground working against you, and when turning around as you jump you can keep most of your speed in the opposite direction.
However, friction during jump crouch will significantly reduce your speed, and the speed cap usually limits horizontal velocity to not much above dash speed (exactly how fast depends on your character’s initial jump velocity), even if you were previously going much faster.
In the case of a “ledgejump,” however, the jump doesn’t consume an aircharge, but uses the airjump rules for X velocity. (See below.)
You must wait 5 frames after a jump before you can jump or dash, and must wait 10 frames before you can enter a Wall Grab state.
Air Jump
A jump performed in midair has no jumpsquat or startup delay, and thus occurs instantly.
As such, jumps in midair cannot be a shorthop and will always give the same height as a fulljump.
At the start of an air jump, your Y velocity is set (or left alone) using the same rules as with ground jumps, above. However, your X velocity is set according to what direction you’re pressing:
- If pressing neither left nor right and your X velocity is between positive and negative 300, it’s immediately set to 0. Otherwise, it’s left at its current value.
- If pressing a direction, then your X velocity is set to a minimum of 300 in that direction if it’s less (or in the opposite direction) – If it’s already 300 or greater in the appropriate direction, then it’s left at its current value.
Aerial Dash Jumping (Air Dashjump)
Supers
The super takes a variable amount of time depending on the number of enemies it hits.
Generally, the amount of time one enemy adds is fairly small, so you need to be cleaning several enemies per attack to make it worth using heavy attacks to reduce the number of enemies a super will hit.
However, there’s a base amount of time that a super takes, and this base amount is doubled if the super hits at least one enemy.
Empty super
In the case where a super is primarily being used to clean surface dust or dustblocks, the super will come out much faster if it’s not hitting any enemies.
Ranges
Enemy hitrange is a square
Dustblock hitrange is a circle
Dust-on-Surface hitrange is a circle requiring Line Of Sight (same circle as dustblocks?)
Other Properties
Grants Hitrise upon coming out of the Super
Applies time dilation during startup (expand on this more if we know more about it exactly)
Boosts can be preserved through a super, Including reversing the boost.
Attack Time
The attack time of a super depends whether you will be hitting enemies with it or not.
An empty Super has a attack time of 22f.
A super which hits enemies has a base attack time of 36.3f with each target adding an additional 7.7f. Time is rounded up to the nearest subframe.
Walls
Wall Grab
Grabbing a Wall can actually be used to cancel several different states, most notably dashes and attack recovery.
Walls can be used to cancel heavy attack recovery or perform a followup attack in a normally disallowed direction (seen on Dahlia and Archive), cancel aerial dashes to immediately let you downdash (seen on Titan), and cancel hitrise out of attacks that hit enemies (seen on Exa Difficult and Yotta Difficult).
Wall Grab itself may be canceled immediately by simply pressing away from the wall.
When you do so, if you have downward Y velocity and are not holding down, your Y velocity is set to 0. If you have upward Y velocity or are holding down, you keep your current Y velocity.
Wall Run
Initiated by pressing up during a wall grab, wall runs immediately set your speed to 522 in the direction of the wall if it is less.
During the first 21 frames speed decays linearly, after which it begins a significantly faster logarithmic decay.
Unlike Wall Grab, Wall Run cannot be canceled by pressing away from the wall, only by walljumping, walldashing, or reaching the ledge or ceiling at the top of the wall.
Wall Slide
When touching towards a wall, you can slide down it, most frequently done via “Wall Tapping” the wall while falling, or simply by sliding down a long slanted wall such as in the ending of Archive.
Speed of the wall slide will vary based on character, directional inputs, and the angle of the wall.
Wall Jump
Has 5 frames of startup before jumping off of the wall, these can be edge cancelled however, which is usually done at the top of a wall as we are wallrunning up it, and very occasionally at the bottom of a wall as we fall past it.
These give you the same height of a regular grounded or aerial jump, but usually give you only 348 horizontal speed and radically limit your air control until the peak of your jump.
When jumping off an overhanging slanted wall, however, you receive significantly more horizontal speed, actually slightly over dash speed..
If the player is close enough to a wall when inputting a jump in midair, they will be immediately pulled over to the wall and start a walljump instead of an airjump.
This can be used to save some time by walljumping before actually reaching the wall, but can also be fatal if the nearby wall has spikes on it.
When performing an “early” walljump like this, if the player has upward velocity in the air and is holding up and toward the wall, the player will actually get some slight upward speed during the beginning of the walljump startup, as they would if they started a wallrun immediately before walljumping.
Walljumps have no startup when performed from “wall grab idle” state, but reaching that state requires hanging on a wall for so long this is almost never useful.
If you’re jumping off a left-facing slant wall you may be able to walljump “infinitely”. See Infinite Walljump
Wall Dash
Has 5 frames of startup before releasing from the wall, these can be edge cancelled however, though it is rare to be able to do so.
If you also have an air charge to use, you can wall dash and then airjump to jump with significantly higher speed than most walljumps would grant you, at the cost of an aircharge of course.
However, during the very beginning of this dash, you’re still close enough to the wall to be able to walljump off of it, cancelling your dash and returning you to the wall.
As with a walljump, walldashes can be performed when only near a wall, but unlike a walljump, walldashes cannot be performed while holding toward the wall, only with a neutral or away horizontal direction input.
As with walljumps, walldashes have no startup from “wall grab idle” state, but this basically never useful.
Advanced
Aerial Dash Jumping
While in hover state, which begins in the air when a character no longer has upward velocity and ends when falling faster than a certain speed, the order in which inputs are checked allows the player to both dash and jump on the same frame in the air, even if the player has only one aircharge.
In this case, the dash is applied, setting the player’s horizontal speed to dash velocity, then the jump is applied, immediately cancelling the dash and giving the player the vertical velocity of a jump.
This allows the player to gain significant horizontal speed in the air without sacrificing the ability to airjump (or, in the case of Dustkid, airjump twice). These are very useful when wanting to change movement direction in midair while also needing to jump.
As with normal airdashes, a speed conversion is applied at the start so it’s also possible to get an Airdash Boost when performing an Aerial Dashjump, which is known as an Aerial Dashjump Boost.
However, since the dash state is immediately canceled, the speed will not be locked in as it would be with a normal Airdash Boost.
Air Walljump
An interesting oversight in the code means that if you grab a wall with vertical speed, and then your vertical speed carries you off the top of the wall without wallrunning, you can store the ability to walljump in midair, with no wall nearby.
This stored ability to walljump only lasts while you remain in the “raise” state, so once your vertical speed hits 0, you can no longer walljump in midair. This is used only once in the entire run.
Attacks
Attacks have 3 phases, startup (aka windup), hit, and recovery.
Light and Heavy attacks have three possible angles: Up, Down, or Neutral.
At the beginning of attack startup, the attack’s direction, either in terms of left/right or up/down, can be changed via directional inputs.
The period where these changes can occur lasts 2 frames for light attacks, 4 frames for vertical direction changes to heavy attacks, and 8 frames for horizontal direction changes to heavy attacks.
Once the player has attacked “behind” them, their attack facing cannot be changed again, even in followup attacks, until they’ve completely recovered from attacking.
In order to attack “forward,” they must either wait to completely finish attack recovery, or cancel recovery with an action other than attack (such as grabbing a wall or jumping).
(TODO: merge with basics?)
Time Dilation
During attack startup, the character’s time rate is adjusted such that they move and accelerate less during each subframe, as though time was moving slower for them.
This is referred to as “Time Dilation.”
Only 70% as much time passes for the player during light attack windup, and 2/3rds as much time passes during heavy attack windup (except for Kid, whose heavy attacks still dilate time at the 70% rate).
During this time, shifts in subframe boundaries and the granular nature of movement/acceleration calculations can produce a slightly different end result in movement that should theoretically just be the same movement but iterated through more slowly.
Taking advantage of these calculation differences to produce a more favorable result is referred to as “Time Manipulation,” but this is done fairly rarely since the Time Dilation itself will always have a time cost.
Notably, attack startup on the ground forces the character into idle state, which has stronger friction than even holding opposite to your current movement direction, and thus allows you to slow down more quickly.
Idle state also allows the character to open doors while still moving.
One exception is on a ground slope, where holding down will keep the character in slopeslide state rather than idle state, which is preferable when high friction is not a desired effect of the attack.
At the end of startup, the attack makes a single check to see what the attack hits, with no lingering hitbox.
When an attack connects with enemies, if the character is in midair, their upward velocity will be increased to a certain minimum if it is less.
This slight upward nudge is referred to as Hitrise
When the player hits dustblocks in midair, they don’t get an upward nudge but their vertical velocity will be set to 0 if they were travelling downward.
Hitstop
When an attack hits an enemy or dustblocks, the character (and the targets in the case of enemies) will be “frozen in time” for a period of time based on the attack and what was being hit.
This is referred to as “hitstop,” and it lasts 1 frame for hits on dustblocks, and 2.5 or 7.5 frames (0.5 rounding up to 3 subframes as with dashes) respectively for light and heavy attacks on enemies.
This hitstop begins one frame after the character detects that the attack has finished, so there’s usually one frame when the player can input actions that cannot be performed during attack startup (e.g. ground dashes) but before hitstop occurs.
Hitstop will still apply afterward as normal, but in particular it is often highly favorable to dash immediately upon an attack connecting to minimize time spent outside of dash state, and sometimes to convert the hitrise to forward speed via an Airdash Boost.
This concept is demonstrated in the top replays of the Atlas map taskid by fishmcmuffins
Iteration Order of Attacks
Though the attack will hit enemies after a consistent amount of time, the character will react to the hit having completed (and clean surface dust) dependent on the Iteration Order of the attack hitbox in comparison to your character.
This can sometimes be manipulated favorably via Iteration Boundaries.
While it’s unlikely, iteration order can occasionally cause dust that would otherwise be cleaned by an attack to be iterated after the level completion (e.g. hitting the enemy), resulting in A completion where S completion would have been expected. This is demonstrated in this replay by gonX of the Atlas map Big Metal Shaft by Kuitar
Attack Recovery
Attack Recovery can be cancelled via jumps, dashes or grabbing a wall. This is Known as Heavy Cancelling, or Light Cancelling.
Cancelling recovery used on nearly every single attack in the entire TAS.
Light or Heavy attacks can be completely canceled during startup with a walldash or super attack input, and downward-angled aerial Light attacks are cancelled by landing on the ground.
Cancelling attack startup with a super input can be useful for time manipulation and positioning, and cancelling light startup by landing can be helpful to buffer certain ground actions from the air, though a light attack canceled in this way always results in at least one subframe of “land” state which has fairly unfavorable friction properties.
Bonking
Also known as Ceiling Bonking and Head Bonking.
Hitting your head on a ceiling without clinging to the ceiling, is useful when the ceiling is close to your current height, as you can jump cancel and downdash sooner than a dash cancel would allow.
Ceiling boosts can be achieved without clinging to the ceiling, meaning in many circumstances it’s best to just briefly bonk the ceiling to get a small ceiling boost rather than having to actually grab the ceiling.
Droofs
Walls and ceilings in this game have a “sticky” property where coming in contact with them makes it a little difficult to move away from them until the character grabs then releases the surface.
In some situations this can be problematic, but it can be used to gain speed in certain situations.
When your character gets stuck to a wall but hasn’t actually grabbed it, they remain in the appropriate airborne state (jump, raise, hover or fall) and are affected by gravity as normal, but their left/right motion is forced to remain in line with the wall in question.
For overhanging slanted walls, this can actually give the player great horizontal speed as the character falls as per normal, but is pulled along sideways by the stickiness of the wall above them.
For somewhat arcane reasons, this maneuver is known as a Droof.
It is not possible to droof on leftward slants.
Magnet Hijack Boost
At the exact moment that a ceiling changes angle, your character’s speed will be angled to line up with the new angle of a ceiling.
If simultaneous to this your character does something that makes their movement not line up with the angle of the ceiling, this will be overridden.
In particular, if your character downdashes, giving them significant downward velocity, precisely at a corner on a ceiling, their new speed including the velocity of the downdash will be calculated then angled to line up with the ceiling.
This gives a significant speed boost, often at an upward angle, without requiring use of an aircharge.
Taking advantage of MHBs requires fairly specific ceiling geometry, but when possible it can quickly generate high speeds in situations where that would otherwise be impossible without the use of an aircharge.
The same magnetic sticky phenomenon used for MHB’s is also how Zetta Slopes work.
Early Exit
If we finish the level during level exit fadeout, we still receive credit for completing the level.
This will be done on nearly every level in the game, as it both starts the fadeout as soon as possible (usually saving 18 frames per level) and skips the extremely slow score screen.
Early exits do place some restrictions on what actions can be done during fadeout and sometimes a slower IGT is gotten as a result of saving real time from allowing a sooner early exit.
Hitrise
Infinite Walljump
One reason for the extra horizontal speed when jumping off an overhanging slanted wall is to push the player further away from the wall to prevent them from repeatedly walljumping off the same wall.
However, with left-facing overhanging slant walls, left air friction rapidly reduces that speed below 522, so all characters other than dustkid will still be close enough to the wall to walljump again after the 5 frames during which you can’t jump or dash at the beginning of a jump.
This process can be repeated indefinitely as long as the slanted wall continues, though having to repeatedly undergo jump startup means it usually isn’t very fast.
Ledge Cancels
Whenever we climb over the top of a wall, we can avoid spending a lot of time floating above the ground by ledge canceling (downdash -> dash). This is one of the few uses for Double Tap Dash as the operation (down -> down -> dash) is easier than (down+dash -> dash).
Mantles
A Mantle is another form for ledge canceling, but it requires an aircharge.
By dashing at ground height (within 4(?) frames of leaving wallclimb) we are on the ground down to 1(?) frame faster than a normal ledge cancel. However, there are often better uses for an aircharge prior to the wallclimb.
Ledge Climb
When wallrunning, if you reach the top of the wall you will climb over the ledge and enter a special hover state.
Your Y value is modified through a special separate variable so that you are still able to downdash and dashjump while moving upwards, which is normally not possible.
Ledgeclimbs are nearly always cancelled via Mantling or Ledge Cancelling.
They are rarely useful to gain a small amount of additional height for an attack or before Aerial Dashjumping.
Ledge Clips
The corners of ledges are not completely solid, and can be clipped into and used to push yourself upwards or downwards slightly by doing so.
These are abused in various ways: to gain a small amount of extra height, to airjump/dash slightly earlier than should be possible when falling past a ceiling, to get extra falling speed or better align certain boosts, etc.
Ledgeclipping is sometimes important to avoid or delay, however, since when ledgeclipping up to a higher ledge than you technically should be able to reach, you retain your velocity when the ledgeclip bumps you upward, which can actually delay the time you can land on that ledge as you get stuck in hover.
Seam Attacks
Normally, attacks on surface dust are blocked by impeding walls.
The direction of the attack matters for this check, so a downward attack can clean dust on the far side of a wall as long as the attack isn’t blocked by a ceiling above it, but a side attack won’t normally be able to clean dust on the far side of a wall.
However, under certain circumstances, it’s possible for the line-of-sight calculations performed to squeeze through the seams between adjacent tiles and clean some dust on the far side.
This only works when the relevant coordinates are negative (e.g. if Y coordinates are negative, there’s a slight gap between vertically adjacent tiles), but by lining up attacks this way it’s sometimes possible to reach dust much further away than would normally be possible, since a side heavy attack or a super will have much more horizontal reach than the up/down heavy which you would normally need to use to clean dust on the other side of a wall.
Also applies to Dust Spreading in rare cases, which causes dust to spread in an unreachable location through a wall, as demonstrated by Fishy in this Store Room (AS) replay.
TODO: insert example screenshot of seam attack
Slope and Spike jumps
As vaguely mentioned in Ground Jump, a jump from slopeslide state has no startup. As such it can never be a shorthop.
It is also a grounded jump, so X speed conversion happens as with other ground jumps.
Spike Jumps
Notably, it’s possible to transition from hover or fall state, to land state, to slopeslide state, and then jump all within a single subframe.
This means that in the case of a spiked slope, it’s possible to actually land on the spikes and jump back off before the game checks if the spikes should kill you. This is known as a “spikejump.”
Spikejumps normally require buffering the jump input and thus requires that you have used your aircharge, but with precise positioning it’s possible to spikejump even when you still have an aircharge by aligning yourself to land on the first subframe.
Similarly, dustblock slopes can be jumped off of before the game checks that you should collect them.
However, you will always collect the surface dust from a solid slope even if you jump off it immediately.
Tera Drop/Jump
A 1 tile wide gap with spikes on both sides is known as a Tera gap.
These have a 3 unit gap that the character can fit within without dying.
Can be jumped up between, or fallen through (known as a Tera Jump or Tera Drop respectively)
A gap with spikes only on 1 side is known as a Half-Tera
This is occasionally used in the Nexus, Tera Difficult and Yotta Difficult (and others?)
Expert
Attack Hitboxes

Click image to view full album on Imgur
ah_ = attack heavy
al_ = attack light
_f = front
_u = up
_b = back
_ah = aerial front
_au = aerial up
_ad = aerial down
_of = offset relative to bottom center of character

Dustman

      //heavy
      ah_f.left = 0; ah_f.right = 285; ah_f.top = -48; ah_f.bottom = 48; ah_f_of.x = -10; ah_f_of.y = -48;        //DONE
      ah_u.left = -70; ah_u.right = 70; ah_u.top = -230; ah_u.bottom = 0; ah_u_of.x = 60; ah_u_of.y = -50;        //DONE
      ah_d.left = -70; ah_d.right = 70; ah_d.top = 0; ah_d.bottom = 225; ah_d_of.x = 70; ah_d_of.y = -220;        //DONE
      //air
      ah_af.left = 0; ah_af.right = 285; ah_af.top = -48; ah_af.bottom = 48; ah_af_of.x = -10; ah_af_of.y = -48;      //DONE
      ah_au.left = -75; ah_au.right = 75; ah_au.top = -205; ah_au.bottom = 0; ah_au_of.x = 65; ah_au_of.y = -70;      //DONE
      ah_ad.left = -80; ah_ad.right = 80; ah_ad.top = 0; ah_ad.bottom = 270; ah_ad_of.x = 80; ah_ad_of.y = -200;      //DONE

      ////light
      al_f.left = 0; al_f.right = 170; al_f.top = -65; al_f.bottom = 65; al_f_of.x = -10; al_f_of.y = -65;        //DONE
      al_u.left = -55; al_u.right = 55; al_u.top = -170; al_u.bottom = 0;  al_u_of.x = 45; al_u_of.y = -50;        //DONE
      al_d.left = -82; al_d.right = 82; al_d.top = 0; al_d.bottom = 136; al_d_of.x = 74; al_d_of.y = -131;        //DONE
      //air
      al_af.left = 0; al_af.right = 170; al_af.top = -65; al_af.bottom = 65; al_af_of.x = -10; al_af_of.y = -65;          //DONE
      al_au.left = -55; al_au.right = 55; al_au.top = -170; al_au.bottom = 0; al_au_of.x = 45; al_au_of.y = -50;      //DONE
      al_ad.left = -50; al_ad.right = 50; al_ad.top = 0; al_ad.bottom = 110;  al_ad_of.x = 40; al_ad_of.y = -55;      //done

Dustgirl

  dm.ah_f.left = 0; dm.ah_f.right = 285; dm.ah_f.top = -60;
  dm.ah_f.bottom = 60; dm.ah_f_of.x = -10; dm.ah_f_of.y = -60;        //DONE

  dm.ah_u.left = -70; dm.ah_u.right = 70; dm.ah_u.top = -205;
  dm.ah_u.bottom = 0; dm.ah_u_of.x = 70; dm.ah_u_of.y = -80;        //DONE

  dm.ah_d.left = -80; dm.ah_d.right = 80; dm.ah_d.top = 0;dm.ah_d.bottom = 225;dm.ah_d_of.x = 70;dm.ah_d_of.y = -220;        //DONE
  //air
 dm.ah_af.left = 0;dm.ah_af.right = 285;dm.ah_af.top = -60;dm.ah_af.bottom = 60;dm.ah_af_of.x = -10;dm.ah_af_of.y = -60;      //
 dm.ah_au.left = -70;dm.ah_au.right = 70;dm.ah_au.top = -205;dm.ah_au.bottom = 0;dm.ah_au_of.x = 70;dm.ah_au_of.y = -80;      //
 dm.ah_ad.left = -80;dm.ah_ad.right = 80;dm.ah_ad.top = 0;dm.ah_ad.bottom = 270;dm.ah_ad_of.x = 80;dm.ah_ad_of.y = -200;      //DONE


  ////light
  dm.al_f.left = 0; dm.al_f.right = 170; dm.al_f.top = -50; dm.al_f.bottom = 50; dm.al_f_of.x = -10; dm.al_f_of.y = -50;        //DONE
  dm.al_u.left = -60; dm.al_u.right = 60; dm.al_u.top = -150; dm.al_u.bottom = 0;  dm.al_u_of.x = 45; dm.al_u_of.y = -60;        //DONE
  dm.al_d.left = -82; dm.al_d.right = 82; dm.al_d.top = 0; dm.al_d.bottom = 136; dm.al_d_of.x = 74; dm.al_d_of.y = -131;        //DONE
  //air
  dm.al_af.left = 0; dm.al_af.right = 170; dm.al_af.top = -50; dm.al_af.bottom = 50; dm.al_af_of.x = -10; dm.al_af_of.y = -50;          //DONE
  dm.al_au.left = -60; dm.al_au.right = 60; dm.al_au.top = -150; dm.al_au.bottom = 0; dm.al_au_of.x = 45; dm.al_au_of.y = -60;      //DONe
  dm.al_ad.left = -55; dm.al_ad.right = 55; dm.al_ad.top = 0; dm.al_ad.bottom = 120;  dm.al_ad_of.x = 32; dm.al_ad_of.y = -65;      //DONE


Dustkid

  dm.ah_f.left = 0;dm.ah_f.right = 195;dm.ah_f.top = -55;dm.ah_f.bottom = 55;dm.ah_f_of.x = -10;dm.ah_f_of.y = -55;        //DONE
 dm.ah_u.left = -60;dm.ah_u.right = 60;dm.ah_u.top = -195;dm.ah_u.bottom = 0;dm.ah_u_of.x = 40;dm.ah_u_of.y = -30;        //DONE
 dm.ah_d.left = -65;dm.ah_d.right = 65;dm.ah_d.top = 0;dm.ah_d.bottom = 185;dm.ah_d_of.x = 57;dm.ah_d_of.y = -180;        //DONE
  //air
 dm.ah_af.left = 0;dm.ah_af.right = 195;dm.ah_af.top = -55;dm.ah_af.bottom = 55;dm.ah_af_of.x = -10;dm.ah_af_of.y = -55;      //
 dm.ah_au.left = -60;dm.ah_au.right = 60;dm.ah_au.top = -195;dm.ah_au.bottom = 0;dm.ah_au_of.x = 40;dm.ah_au_of.y = -30;      //
 dm.ah_ad.left = -65;dm.ah_ad.right = 65;dm.ah_ad.top = 0;dm.ah_ad.bottom = 185;dm.ah_ad_of.x = 57;dm.ah_ad_of.y = -180;      //

  ////light
  dm.al_f.left = 0; dm.al_f.right = 150; dm.al_f.top = -45; dm.al_f.bottom = 45; dm.al_f_of.x = -10; dm.al_f_of.y = -45;        //DONE
  dm.al_u.left = -50; dm.al_u.right = 50; dm.al_u.top = -130; dm.al_u.bottom = 0;  dm.al_u_of.x = 40; dm.al_u_of.y = -60;        //DONE
  dm.al_d.left = -75; dm.al_d.right = 75; dm.al_d.top = 0; dm.al_d.bottom = 126; dm.al_d_of.x = 55; dm.al_d_of.y = -121;        //DONE
  //air
  dm.al_af.left = 0; dm.al_af.right = 150; dm.al_af.top = -45; dm.al_af.bottom = 45; dm.al_af_of.x = -10; dm.al_af_of.y = -45;          //DONE
  dm.al_au.left = -50; dm.al_au.right = 50; dm.al_au.top = -130; dm.al_au.bottom = 0; dm.al_au_of.x = 40; dm.al_au_of.y = -60;      //DONE
  dm.al_ad.left = -75; dm.al_ad.right = 75; dm.al_ad.top = 0; dm.al_ad.bottom = 135;  dm.al_ad_of.x = 55; dm.al_ad_of.y = -121;      //DONE

Dustworth
  //heavy
 dm.ah_f.left = 0;dm.ah_f.right = 295;dm.ah_f.top = -70;dm.ah_f.bottom = 70;dm.ah_f_of.x = -10;dm.ah_f_of.y = -70;        //DONE
 dm.ah_u.left = -80;dm.ah_u.right = 80;dm.ah_u.top = -230;dm.ah_u.bottom = 0;dm.ah_u_of.x = 80;dm.ah_u_of.y = -70;        //DONE
 dm.ah_d.left = -110;dm.ah_d.right = 110;dm.ah_d.top = 0;dm.ah_d.bottom = 165;dm.ah_d_of.x = 100;dm.ah_d_of.y = -130;        //DONE
  //air
 dm.ah_af.left = 0;dm.ah_af.right = 295;dm.ah_af.top = -70;dm.ah_af.bottom = 70;dm.ah_af_of.x = -10;dm.ah_af_of.y = -70;      //DONE
 dm.ah_au.left = -85;dm.ah_au.right = 85;dm.ah_au.top = -230;dm.ah_au.bottom = 0;dm.ah_au_of.x = 75;dm.ah_au_of.y = -70;      //DONE
 dm.ah_ad.left = -80;dm.ah_ad.right = 80;dm.ah_ad.top = 0;dm.ah_ad.bottom = 200;dm.ah_ad_of.x = 60;dm.ah_ad_of.y = -100;      //

  ////light
  dm.al_f.left = 0; dm.al_f.right = 235; dm.al_f.top = -70; dm.al_f.bottom = 70; dm.al_f_of.x = -10; dm.al_f_of.y = -70;        //DONE
  dm.al_u.left = -75; dm.al_u.right = 75; dm.al_u.top = -200; dm.al_u.bottom = 0;  dm.al_u_of.x = 50; dm.al_u_of.y = -70;        //
  dm.al_d.left = -100; dm.al_d.right = 100; dm.al_d.top = 0; dm.al_d.bottom = 120; dm.al_d_of.x = 90; dm.al_d_of.y = -111;        //DONE

  //air
  dm.al_af.left = 0; dm.al_af.right = 235; dm.al_af.top = -70; dm.al_af.bottom = 70; dm.al_af_of.x = -10; dm.al_af_of.y = -70;          //DONE
  dm.al_au.left = -75; dm.al_au.right = 75; dm.al_au.top = -200; dm.al_au.bottom = 0; dm.al_au_of.x = 50; dm.al_au_of.y = -70;      //
dm.al_ad.left = -70; dm.al_ad.right = 70; dm.al_ad.top = 0; dm.al_ad.bottom = 160; dm.al_ad_of.x = 30; dm.al_ad_of.y = -111; //
Code source: gist.github.com (pinned in #tasforce on Discord server)
Bad State Transitions
Some errors in state transition logic mean that state transition checks can be run for states that the player has already transitioned out of, allowing for a variety of abusable effects:
Itay Dash and Taildash
When simultaneously pressing dash+jump from slope_slide state, slope_slide transitions to jump and then to dash despite already having transitioned to jump state, resulting in a horizontal airdash from the slope despite normally not being able to airdash for the first five frames after jumping.
This is known as an “Itay Dash,” and is used rarely during some nexus movement.
However, when transitioning from idle or skid state then simultaneously pressing down+slopeDirection+dash+jump, we can enter slope_slide and get the instant airdash, followed by a second bad state transition from idle or skid to hover state, which in turn can downdash, giving us an instantaneous downhill speed boost.
This is referred to as a “taildash,” and is useful for rapidly getting a modest slopeboost.
Slopesurfing
When in slope_slide state, pressing dash+heavy simultaneously results in both occuring and then immediately cancelling each other, putting the player into idle state which then immediately can transition to slope_slide or run depending on direction input.
This is referred to as “slopesurfing” and has a variety of applications.
By pressing down+dash+heavy, one can get to dash speed and immediately resume slopesliding and accelerating. This generally isn’t as useful as a taildash, but can be performed in many situations where a taildash isn’t immediately possible. Alternately, when accelerating downhill, the nature of the bad state transitions also results in you accelerating very slightly faster (one subframe gets double the acceleration, so since you can only input every other frame, results in 10% faster acceleration overall).
Lastly, this “consumes” the grounded dash input but still sends a downdash input, which will be used if slide off the bottom of the slope later this frame.
By pressing (left/right)+dash+heavy, one can dash, then go into idle state followed by run, then we can release forward and enter skid next frame, enabling Taildashing and Raiserunning (see below).
Lastly, by pressing no directions when pressing dash+heavy, we can enter idle state, which we can transition into run next frame.
That transition to run converts all our speed into movement in the appropriate direction, allowing us to almost instantly reverse a speed boost with comparatively little speed loss.
Raiserunning
When going from skid to slope_slide to jump (via slopejumping) in one subframe, a bad state transition occurs where the skid logic notices that you have become airborne and, assuming that you’ve skidded off an upward slope, puts you into state raise.
Unlike jump state, raise state has no restrictions on jumping, dashing, or most importantly, grabbing walls.
This allows us to transfer all the speed of the wallboost we get, usually close to or even higher than the character’s initial jump speed, into a wallrun, which decelerates much more slowly than a jump would.
Updashing
By dashing into a wall at a less than 90 degree angle (e.g. from a slope into a flat wall), a collision occurs, generally reducing your speed to 80% or 50% what it was before and aligning your velocity with the wall.
However, if you’re not pressing toward the wall, you don’t enter wall grab state and instead remain in dash state, which means your (admittedly reduced) speed stays locked in either for the remainder of the dash or until a wallgrab is started, at which point the player can begin a wallrun as normal.
In the cases where this conversion results in a favorable speed up the wall, this functionally adds some frictionless time to the start of the wallrun.
Notably, while in dash state the player will not collect surface dust or break wall dustblocks, and if the wall changes angle again another collision will occur while the player would seamlessly change directions while wallrunning.
Since the most common state which allows for Updashing (a slope next to a vertical wall) also allows for Raiserunning, it’s often necessary to weigh the two options against each other and determine which produces the most favorable result.
Character States
Your movement abilities generally correspond to a state that you will be put into that lasts for some duration.
These states, and the transitions between states are what makes up a large portion of the movement techniques seen within the TAS.
Dustforce accepts inputs at 60 fps. However, for the player physics, steps are done at a rate of 5 per frame, we count each of these physics steps as 1 “subframe”.
States may not last a “clean” whole frame number, and instead might end on a subframe instead.
Inputs are only registered on a full-frame basis, but manipulating our inputs so that a specific event occurs at a specific subframe is still often possible.
Entity Hitboxes
entity
left right top bottom (unit displacement from sprite center)
dust_man
-24 24 -96 0
hittable_apple
-24 24 -24 24
enemy_tutorial_square
-40 40 -40 40
enemy_tutorial_hexagon
-60 60 -60 60
enemy_critter
-24 24 -24 24
enemy_bear
-50 50 -130 0
enemy_wolf
-48 48 -48 0
enemy_porcupine
-24 24 -48 0
enemy_stonebro
-24 24 -48 0
enemy_stoneboss
-48 48 -96 0
enemy_hawk
-40 40 -24 24
enemy_gargoyle_small
-24 24 -24 24
enemy_gargoyle_big
-24 24 -96 0
enemy_book
-40 40 -24 24
enemy_knight
-24 24 -48 0
enemy_maid
-25 25 -96 0
enemy_butler
-24 24 -48 0
enemy_chest_scrolls
-48 48 -48 0
enemy_chest_treasure
-48 48 -48 0
enemy_scrolls
-24 24 -24 24
enemy_treasure
-24 24 -24 24
enemy_flag
-24 24 -48 0
enemy_trash_ball
-24 24 -24 24
enemy_trash_beast
-50 50 -130 0
enemy_trash_can
-36 36 -96 0
enemy_trash_bag
-24 24 -24 24
enemy_trash_tire
-24 24 -24 24
enemy_slime_ball
-24 24 -24 24
enemy_slime_beast
-50 50 -130 0
enemy_slime_barrel
-24 24 -24 24
enemy_spring_ball (left)
-81 1 -38 33
enemy_spring_ball (right)
-1 81 -33 38
enemy_spring_ball (up)
-33 38 -81 1
enemy_spring_ball (down)
-38 33 -1 81
source: pastebin.com (posted in #tasforce by Zaandaa)
Facegrinding / Toegrinding
During the first 10 frames of jump state or during an attack, the player cannot grab walls.
If the player is adjacent to a wall during this time and presses toward the wall, the mechanics for speed conversion upon hitting a surface will be run every subframe, causing the character to lose a significant amount of vertical speed per frame, and when this property was discovered it was called “facegrinding” (particularly when travelling upward) because of the harsh speed loss.
This is usually a situation to be avoided, though occasionally it’s necessary to slow the character down so that we have an opportunity to grab a wall before the character passes it completely
Jorfs
Named after the player who discovered it, there’s a small oversight with edges of spiked platforms which allows for 1 “pixel” of leniency where you can stand on the platform without the spikes killing you.
This “Jorf” pixel is extremely handy for quick platforming, as you essentially have another platform to utilize to jump, regain aircharges, or even get a boost (often called Jorfboosting).
This applies to ceilings, floors and walls, regardless if they are sloped or flat. Slanted and sloped jorfs are especially noteworthy, as the window of leniency is significantly wider due to the angle of the ground and, with a downhill angle, can be particularly effective for generating boosts.
Due to a separate oversight, the lower left corner of your character does not detect spikes on walls at all, so there is a much larger window of safety near the top right of spiked walls.
Despite the difference in cause and size, these are still often mistakenly known as “Walljorfs,” with Jorfs on other corners of walls sometimes being referred to as “true walljorfs” or similar.
Because of their great size (a full tile, rather than only one pixel) they can much more easily be used to walljump or wallcancel, and they allow for a brief wallrun as well.
Playable Characters
Dustman

-
522Dash Speed
-
23Hover Frames
-
25Fulljump Frames
-
15Shorthop frames
-
1Air Charges
Dustman and Dustgirl both have the highest terminal Velocity, so they are able to get faster slopeboosts than Dustkid or Dustworth.
Has slightly more favorable (a 0.7% difference) ground friction compared to Dustgirl.
Has the best Mapler Slides, as his neutral ceiling run is frictionless for 15 frames, the rest of the characters only have 10.
This is only the case for “regular” Dustman, the virtual-Dustman does not have this benefit. This is due to an extra frame of animation for the ceiling grab only in the files of regular dustman.
Dustgirl
-
522Dash Speed
-
21Hover Frames
-
25Fulljump Frames
-
15Shorthop frames
-
1Air Charges
In comparison to Dustman, generally has less advantageous hitboxes on her light attacks, but more useful heavy attacks.
Her heavy attack hitboxes are slightly wider than Dustman’s, which is useful in several places. See Attack Hitboxes.
Accelerates faster than Dustman when falling without downdashing.
This means she gets a bit less distance out of her jumps, but when levels start with the character falling, she reaches terminal velocity slightly sooner than Dustman, giving her a headstart of about 2 frames.
Is located second, rather than first, in the character select, which can save 2 frames switching to/from the characters further right in the list.
Since she and Dustman generally play very similarly, there are several levels where this is actually the deciding factor for character choice.
In comparison to Dustman, she has higher ground friction, so keeping speed with perfect dash rhythm is more important. This is particularly seen in dash rhythm Atlas maps such as How Do I Boost.
Dustkid
-
522Dash Speed
-
27Hover Frames
-
20Fulljump Frames
-
12Shorthop frames
-
2Air Charges
Has 2 maximum air charges and restores both upon cleaning an enemy in midair, all other characters have only 1.
Due to a programming error, she only starts a level with 1 air charge if the start position is located in the air. The extra aircharge can be used on additional dashes allowing her to lock her speed for longer than other characters over long aerial distances.
Smaller jump height, somewhat mitigated by having a triple jump as opposed to a double jump, but is still generally a weakness.
Smaller attack hitboxes, but extremely fast attack speed.
Least used character in the TAS, although TAS allows her niche strengths to be more strongly taken advantage of.
Dustworth
-
495Dash Speed
-
25Hover Frames
-
29Fulljump Frames
-
18Shorthop frames
-
13Light Frontswing F
-
20Heavy Frontswing F
-
29Light Total F
-
48Heavy Total F
-
1843Terminal Velocity
-
50Terminal Velocity F
-
25Terminal V Downdash F
-
1Air Charges
Largest jump height
Large attack hitboxes with a slow attack speed
Dash speed is not also Maximum Run speed like is the case for other characters, he must spend 11~ frames accelerating after a dash finishes to fully accelerate from a stop.
Most used character in the TAS, since his high jumps and large attacks are extremely useful.
Climbing is generally the slowest movement we have to do, and Dustworth climbs the fastest.
Levels
Tutorials
-
1960Layer 14
-
8Layer 15
-
728Layer 16
-
27462Layer 17
-
3533Layer 19
-
160Covered Tiles
-
0Dustblocks
-
162Filthy Surfaces
-
0Spiked Surfaces
-
0Enemy Dust
-
162Total Dust
-
1023Layer 16
-
22901Layer 17
-
2234Layer 19
-
38Covered Tiles
-
0Dustblocks
-
38Filthy Surfaces
-
0Spiked Surfaces
-
47Enemy Dust
-
85Total Dust
-
39Square
-
8Hexagon
-
21617Layer 6
-
31979Layer 8
-
22144Layer 10
-
931Layer 16
-
2453Layer 19
-
80Covered Tiles
-
0Dustblocks
-
80Filthy Surfaces
-
0Spiked Surfaces
-
5Enemy Dust
-
85Total Dust
-
5Square
Forest
-
4010Layer 6
-
10414Layer 8
-
25372Layer 11
-
1709Layer 12
-
4721Layer 13
-
92Layer 16
-
17744Layer 19
-
114Covered Tiles
-
0Dustblocks
-
94Filthy Surfaces
-
22Spiked Surfaces
-
15Enemy Dust
-
109Total Dust
-
5Critter
-
16759Layer 11
-
1746Layer 16
-
3Layer 17
-
22025Layer 19
-
11012Layer 20
-
124Covered Tiles
-
0Dustblocks
-
124Filthy Surfaces
-
0Spiked Surfaces
-
15Enemy Dust
-
139Total Dust
-
5Critter
-
11458Layer 11
-
1046Layer 13
-
1763Layer 16
-
12092Layer 19
-
18Layer 20
-
25Covered Tiles
-
0Dustblocks
-
25Filthy Surfaces
-
0Spiked Surfaces
-
21Enemy Dust
-
46Total Dust
-
7Critter
-
1296Layer 7
-
2040Layer 11
-
161Layer 12
-
1824Layer 16
-
27137Layer 19
-
15053Layer 20
-
94Covered Tiles
-
0Dustblocks
-
94Filthy Surfaces
-
0Spiked Surfaces
-
21Enemy Dust
-
115Total Dust
-
7Critter
-
8874Layer 8
-
16400Layer 10
-
8101Layer 12
-
4603Layer 13
-
1170Layer 15
-
358Layer 17
-
30773Layer 19
-
341Covered Tiles
-
4Dustblocks
-
126Filthy Surfaces
-
217Spiked Surfaces
-
26Enemy Dust
-
156Total Dust
-
4Critter
-
2Porcupine
-
1Stonebro
-
1Bear
-
638Layer 7
-
2378Layer 8
-
5004Layer 11
-
180Layer 13
-
12Layer 14
-
98Layer 15
-
3013Layer 16
-
19606Layer 19
-
205Covered Tiles
-
14Dustblocks
-
205Filthy Surfaces
-
0Spiked Surfaces
-
56Enemy Dust
-
275Total Dust
-
10Critter
-
1Wolf
-
1Stoneboss
-
1Bear
-
26139Layer 9
-
4704Layer 10
-
20190Layer 11
-
407Layer 16
-
23725Layer 19
-
15310Layer 20
-
202Covered Tiles
-
0Dustblocks
-
202Filthy Surfaces
-
0Spiked Surfaces
-
18Enemy Dust
-
220Total Dust
-
6Critter
-
11Layer 8
-
12144Layer 11
-
14657Layer 12
-
22Layer 15
-
6Layer 17
-
21168Layer 19
-
387Covered Tiles
-
0Dustblocks
-
196Filthy Surfaces
-
198Spiked Surfaces
-
35Enemy Dust
-
231Total Dust
-
7Critter
-
1Wolf
-
1Bear
-
4913Layer 8
-
12155Layer 11
-
36Layer 15
-
2119Layer 16
-
36684Layer 19
-
156Covered Tiles
-
0Dustblocks
-
82Filthy Surfaces
-
75Spiked Surfaces
-
60Enemy Dust
-
142Total Dust
-
4Stoneboss
-
4Stonebro
-
413Layer 9
-
888Layer 10
-
554Layer 11
-
184Layer 14
-
338Layer 15
-
1197Layer 16
-
17767Layer 19
-
174Covered Tiles
-
0Dustblocks
-
142Filthy Surfaces
-
32Spiked Surfaces
-
18Enemy Dust
-
160Total Dust
-
3Critter
-
1Bear
-
10346Layer 8
-
10581Layer 12
-
1792Layer 13
-
12487Layer 19
-
241Covered Tiles
-
0Dustblocks
-
187Filthy Surfaces
-
54Spiked Surfaces
-
38Enemy Dust
-
225Total Dust
-
5Critter
-
1Wolf
-
2Bear
-
10982Layer 6
-
12336Layer 8
-
2135Layer 9
-
3636Layer 10
-
9462Layer 11
-
88Layer 14
-
8Layer 15
-
19023Layer 19
-
184Covered Tiles
-
0Dustblocks
-
144Filthy Surfaces
-
40Spiked Surfaces
-
54Enemy Dust
-
198Total Dust
-
5Critter
-
1Wolf
-
4Porcupine
-
2Stoneboss
-
2Stonebro
-
8474Layer 11
-
110Layer 13
-
221Layer 14
-
208Layer 15
-
278Layer 17
-
22557Layer 19
-
10Covered Tiles
-
0Dustblocks
-
10Filthy Surfaces
-
0Spiked Surfaces
-
57Enemy Dust
-
67Total Dust
-
3Critter
-
3Porcupine
-
1Stoneboss
-
2Stonebro
-
3Bear
-
4661Layer 8
-
22576Layer 9
-
3507Layer 10
-
4790Layer 11
-
3858Layer 14
-
55Layer 15
-
7698Layer 16
-
33354Layer 19
-
486Covered Tiles
-
106Dustblocks
-
180Filthy Surfaces
-
340Spiked Surfaces
-
60Enemy Dust
-
346Total Dust
-
12Critter
-
1Stoneboss
-
1Stonebro
-
1Bear
-
183Layer 10
-
1502Layer 11
-
206Layer 14
-
24Layer 15
-
1148Layer 16
-
5999Layer 19
-
260Covered Tiles
-
0Dustblocks
-
58Filthy Surfaces
-
217Spiked Surfaces
-
24Enemy Dust
-
82Total Dust
-
8Critter
-
2726Layer 11
-
2157Layer 16
-
8866Layer 19
-
905Covered Tiles
-
7Dustblocks
-
146Filthy Surfaces
-
940Spiked Surfaces
-
48Enemy Dust
-
201Total Dust
-
12Critter
-
1Stoneboss
Mansion
-
1292Layer 9
-
1073Layer 11
-
659Layer 12
-
185Layer 14
-
336Layer 15
-
430Layer 16
-
938Layer 19
-
9Layer 20
-
55Covered Tiles
-
0Dustblocks
-
55Filthy Surfaces
-
0Spiked Surfaces
-
15Enemy Dust
-
70Total Dust
-
5Gargoyle, Small
-
28710Layer 8
-
1629Layer 11
-
903Layer 15
-
787Layer 16
-
42Layer 17
-
22019Layer 19
-
105Covered Tiles
-
6Dustblocks
-
107Filthy Surfaces
-
0Spiked Surfaces
-
21Enemy Dust
-
134Total Dust
-
7Gargoyle, Small
-
18255Layer 16
-
326Layer 17
-
2021Layer 19
-
164Covered Tiles
-
0Dustblocks
-
164Filthy Surfaces
-
0Spiked Surfaces
-
15Enemy Dust
-
179Total Dust
-
5Gargoyle, Small
-
2865Layer 14
-
4769Layer 15
-
40Layer 16
-
2464Layer 19
-
94Covered Tiles
-
0Dustblocks
-
98Filthy Surfaces
-
0Spiked Surfaces
-
30Enemy Dust
-
128Total Dust
-
10Gargoyle, Small
-
25742Layer 6
-
487Layer 7
-
10436Layer 8
-
8006Layer 11
-
148Layer 12
-
239Layer 13
-
23Layer 14
-
344Layer 15
-
2631Layer 16
-
54Layer 17
-
36312Layer 19
-
418Layer 20
-
317Covered Tiles
-
23Dustblocks
-
294Filthy Surfaces
-
30Spiked Surfaces
-
65Enemy Dust
-
382Total Dust
-
4Gargoyle, Big
-
15Gargoyle, Small
-
23644Layer 6
-
4722Layer 8
-
8031Layer 11
-
178Layer 15
-
7858Layer 16
-
61008Layer 19
-
27Layer 20
-
352Covered Tiles
-
27Dustblocks
-
354Filthy Surfaces
-
0Spiked Surfaces
-
48Enemy Dust
-
429Total Dust
-
3Gargoyle, Big
-
5Gargoyle, Small
-
2Knight
-
1472Layer 6
-
2296Layer 7
-
6059Layer 8
-
1267Layer 9
-
4428Layer 11
-
128Layer 12
-
8Layer 13
-
1381Layer 15
-
5171Layer 16
-
4Layer 17
-
19630Layer 19
-
270Covered Tiles
-
84Dustblocks
-
270Filthy Surfaces
-
0Spiked Surfaces
-
55Enemy Dust
-
409Total Dust
-
2Butler
-
5Maid
-
1Chest, Treasure
-
13Book
-
558Layer 6
-
703Layer 7
-
3566Layer 8
-
4300Layer 9
-
2191Layer 10
-
1768Layer 11
-
262Layer 12
-
111Layer 13
-
2013Layer 15
-
6046Layer 16
-
4Layer 17
-
41974Layer 19
-
812Layer 20
-
238Covered Tiles
-
28Dustblocks
-
239Filthy Surfaces
-
0Spiked Surfaces
-
28Enemy Dust
-
295Total Dust
-
1Maid
-
9Gargoyle, Small
-
124436Layer 6
-
10671Layer 8
-
4136Layer 11
-
3390Layer 16
-
50791Layer 19
-
518Covered Tiles
-
0Dustblocks
-
259Filthy Surfaces
-
260Spiked Surfaces
-
27Enemy Dust
-
286Total Dust
-
6Gargoyle, Small
-
1Knight
-
22361Layer 11
-
407Layer 12
-
4508Layer 13
-
527Layer 14
-
845Layer 16
-
20898Layer 19
-
203Covered Tiles
-
0Dustblocks
-
185Filthy Surfaces
-
18Spiked Surfaces
-
144Enemy Dust
-
329Total Dust
-
2Butler
-
4Maid
-
6Chest, Treasure
-
7Gargoyle, Small
-
7Knight
-
397Layer 9
-
245Layer 10
-
201Layer 11
-
45Layer 12
-
219Layer 15
-
99Layer 16
-
1859Layer 17
-
956Layer 19
-
22Covered Tiles
-
0Dustblocks
-
22Filthy Surfaces
-
0Spiked Surfaces
-
55Enemy Dust
-
77Total Dust
-
2Chest, Scrolls
-
2Gargoyle, Big
-
1Knight
-
6Book
-
42Layer 9
-
2456Layer 10
-
7532Layer 11
-
2954Layer 12
-
711Layer 13
-
66Layer 15
-
5379Layer 16
-
8434Layer 19
-
311Layer 20
-
235Covered Tiles
-
0Dustblocks
-
239Filthy Surfaces
-
0Spiked Surfaces
-
89Enemy Dust
-
328Total Dust
-
1Flag
-
9Gargoyle, Big
-
10Gargoyle, Small
-
1Knight
-
1339Layer 11
-
18Layer 12
-
39Layer 15
-
4421Layer 16
-
3473Layer 19
-
431Covered Tiles
-
24Dustblocks
-
238Filthy Surfaces
-
233Spiked Surfaces
-
27Enemy Dust
-
289Total Dust
-
3Gargoyle, Small
-
2Knight
-
356Layer 6
-
138Layer 7
-
1645Layer 8
-
1173Layer 9
-
688Layer 10
-
1486Layer 11
-
79Layer 14
-
54Layer 15
-
478Layer 16
-
4747Layer 19
-
149Covered Tiles
-
0Dustblocks
-
83Filthy Surfaces
-
77Spiked Surfaces
-
14Enemy Dust
-
97Total Dust
-
1Butler
-
1Maid
-
4Gargoyle, Small
-
4301Layer 8
-
2833Layer 11
-
4761Layer 16
-
127Layer 17
-
975Layer 19
-
162Covered Tiles
-
0Dustblocks
-
168Filthy Surfaces
-
0Spiked Surfaces
-
5Enemy Dust
-
173Total Dust
-
1Flag
-
556Layer 15
-
1066Layer 16
-
1211Layer 19
-
179Covered Tiles
-
16Dustblocks
-
70Filthy Surfaces
-
113Spiked Surfaces
-
108Enemy Dust
-
194Total Dust
-
36Gargoyle, Small
City
-
22Layer 6
-
94Layer 13
-
695Layer 14
-
87Layer 15
-
341Layer 16
-
5638Layer 19
-
283Layer 20
-
11Covered Tiles
-
0Dustblocks
-
11Filthy Surfaces
-
0Spiked Surfaces
-
42Enemy Dust
-
53Total Dust
-
14Ball, Trash
-
13381Layer 8
-
5057Layer 11
-
358Layer 12
-
593Layer 14
-
1Layer 15
-
2925Layer 16
-
163Layer 17
-
33504Layer 19
-
1039Layer 20
-
0Covered Tiles
-
1275Dustblocks
-
0Filthy Surfaces
-
0Spiked Surfaces
-
42Enemy Dust
-
1317Total Dust
-
14Ball, Trash
-
54Layer 13
-
171Layer 14
-
87Layer 15
-
418Layer 16
-
395Layer 17
-
7823Layer 19
-
1355Layer 20
-
115Covered Tiles
-
0Dustblocks
-
121Filthy Surfaces
-
0Spiked Surfaces
-
3Enemy Dust
-
124Total Dust
-
1Ball, Trash
-
553Layer 9
-
428Layer 10
-
854Layer 11
-
141Layer 15
-
708Layer 16
-
430Layer 17
-
1057Layer 19
-
7874Layer 20
-
104Covered Tiles
-
0Dustblocks
-
105Filthy Surfaces
-
0Spiked Surfaces
-
21Enemy Dust
-
126Total Dust
-
7Ball, Trash
-
3985Layer 6
-
534Layer 7
-
134Layer 8
-
2218Layer 9
-
2213Layer 11
-
2979Layer 12
-
15Layer 13
-
516Layer 14
-
2741Layer 15
-
83Layer 16
-
5298Layer 17
-
11083Layer 19
-
6848Layer 20
-
180Covered Tiles
-
57Dustblocks
-
163Filthy Surfaces
-
17Spiked Surfaces
-
21Enemy Dust
-
241Total Dust
-
1Tire
-
6Ball, Trash
-
1116Layer 7
-
6Layer 8
-
182Layer 9
-
6643Layer 11
-
14318Layer 19
-
116Covered Tiles
-
0Dustblocks
-
140Filthy Surfaces
-
0Spiked Surfaces
-
3Enemy Dust
-
143Total Dust
-
1Ball, Trash
-
1264Layer 9
-
408Layer 10
-
626Layer 11
-
3717Layer 15
-
2891Layer 16
-
1Layer 17
-
2406Layer 19
-
202Covered Tiles
-
0Dustblocks
-
202Filthy Surfaces
-
0Spiked Surfaces
-
63Enemy Dust
-
265Total Dust
-
21Ball, Trash
-
12600Layer 8
-
759Layer 11
-
50Layer 12
-
635Layer 13
-
150Layer 15
-
913Layer 16
-
9723Layer 19
-
183Covered Tiles
-
58Dustblocks
-
183Filthy Surfaces
-
0Spiked Surfaces
-
42Enemy Dust
-
283Total Dust
-
1Can, Trash
-
1Beast, Trash
-
8Ball, Trash
-
68684Layer 6
-
500Layer 8
-
573Layer 9
-
12741Layer 10
-
1086Layer 11
-
2796Layer 12
-
6Layer 14
-
54Layer 15
-
76Layer 16
-
229Layer 17
-
20843Layer 19
-
266Covered Tiles
-
92Dustblocks
-
259Filthy Surfaces
-
7Spiked Surfaces
-
39Enemy Dust
-
390Total Dust
-
1Beast, Trash
-
10Ball, Trash
-
21621Layer 11
-
1190Layer 12
-
56Layer 14
-
16076Layer 19
-
244Covered Tiles
-
44Dustblocks
-
139Filthy Surfaces
-
108Spiked Surfaces
-
45Enemy Dust
-
228Total Dust
-
2Beast, Trash
-
9Ball, Trash
-
56Layer 11
-
2527Layer 16
-
2366Layer 19
-
200Covered Tiles
-
8Dustblocks
-
178Filthy Surfaces
-
33Spiked Surfaces
-
30Enemy Dust
-
216Total Dust
-
1Beast, Trash
-
7Ball, Trash
-
820Layer 11
-
3580Layer 16
-
4536Layer 19
-
112Covered Tiles
-
16Dustblocks
-
93Filthy Surfaces
-
20Spiked Surfaces
-
30Enemy Dust
-
139Total Dust
-
2Can, Trash
-
1Beast, Trash
-
1Ball, Trash
-
58760Layer 12
-
38Layer 13
-
18055Layer 15
-
1407Layer 19
-
223Covered Tiles
-
68Dustblocks
-
42Filthy Surfaces
-
186Spiked Surfaces
-
33Enemy Dust
-
143Total Dust
-
11Ball, Trash
-
4076Layer 6
-
7020Layer 7
-
2203Layer 8
-
1813Layer 11
-
3324Layer 16
-
23042Layer 19
-
4189Layer 20
-
435Covered Tiles
-
24Dustblocks
-
216Filthy Surfaces
-
257Spiked Surfaces
-
90Enemy Dust
-
330Total Dust
-
4Can, Trash
-
1Beast, Trash
-
15Ball, Trash
-
2334Layer 9
-
263Layer 11
-
250Layer 16
-
1386Layer 19
-
45Covered Tiles
-
0Dustblocks
-
46Filthy Surfaces
-
0Spiked Surfaces
-
75Enemy Dust
-
121Total Dust
-
3Can, Trash
-
3Beast, Trash
-
4Tire
-
3Ball, Trash
-
38829Layer 6
-
16075Layer 9
-
202Layer 14
-
1380Layer 15
-
1111Layer 16
-
20048Layer 19
-
812Covered Tiles
-
8Dustblocks
-
63Filthy Surfaces
-
832Spiked Surfaces
-
18Enemy Dust
-
89Total Dust
-
2Beast, Trash
Lab
-
6737Layer 10
-
4455Layer 11
-
81Layer 14
-
820Layer 16
-
1449Layer 19
-
14589Layer 20
-
118Covered Tiles
-
0Dustblocks
-
122Filthy Surfaces
-
0Spiked Surfaces
-
15Enemy Dust
-
137Total Dust
-
5Ball, Slime
-
17348Layer 8
-
813Layer 9
-
731Layer 10
-
635Layer 11
-
2626Layer 15
-
20876Layer 16
-
1422Layer 19
-
104Covered Tiles
-
5Dustblocks
-
105Filthy Surfaces
-
0Spiked Surfaces
-
15Enemy Dust
-
125Total Dust
-
5Ball, Slime
-
4Layer 6
-
4847Layer 16
-
729Layer 17
-
30022Layer 19
-
1681Layer 20
-
132Covered Tiles
-
0Dustblocks
-
134Filthy Surfaces
-
0Spiked Surfaces
-
24Enemy Dust
-
158Total Dust
-
8Ball, Slime
-
828Layer 16
-
1414Layer 19
-
191Covered Tiles
-
0Dustblocks
-
191Filthy Surfaces
-
0Spiked Surfaces
-
3Enemy Dust
-
194Total Dust
-
1Ball, Slime
-
41287Layer 11
-
1364Layer 12
-
1556Layer 14
-
4662Layer 16
-
80117Layer 19
-
26276Layer 20
-
254Covered Tiles
-
238Dustblocks
-
254Filthy Surfaces
-
0Spiked Surfaces
-
75Enemy Dust
-
567Total Dust
-
3Ball, Spring
-
4Barrel, Slime
-
1Beast, Slime
-
13Ball, Slime
-
32384Layer 8
-
1249Layer 10
-
260Layer 11
-
1618Layer 15
-
274Layer 16
-
2805Layer 19
-
36127Layer 20
-
407Covered Tiles
-
93Dustblocks
-
168Filthy Surfaces
-
239Spiked Surfaces
-
27Enemy Dust
-
288Total Dust
-
2Beast, Slime
-
3Ball, Slime
-
8766Layer 12
-
5366Layer 13
-
2435Layer 14
-
3037Layer 19
-
15358Layer 20
-
146Covered Tiles
-
6Dustblocks
-
146Filthy Surfaces
-
0Spiked Surfaces
-
96Enemy Dust
-
248Total Dust
-
1Barrel, Slime
-
3Beast, Slime
-
22Ball, Slime
-
61473Layer 6
-
11248Layer 7
-
7068Layer 10
-
2833Layer 16
-
17648Layer 19
-
48Layer 20
-
311Covered Tiles
-
0Dustblocks
-
301Filthy Surfaces
-
12Spiked Surfaces
-
72Enemy Dust
-
373Total Dust
-
3Ball, Spring
-
2Barrel, Slime
-
3Beast, Slime
-
8Ball, Slime
-
136456Layer 6
-
3269Layer 8
-
3504Layer 11
-
21Layer 13
-
4191Layer 16
-
6315Layer 17
-
4079Layer 19
-
38349Layer 20
-
589Covered Tiles
-
21Dustblocks
-
230Filthy Surfaces
-
362Spiked Surfaces
-
39Enemy Dust
-
290Total Dust
-
13Ball, Slime
-
214Layer 8
-
1148Layer 11
-
640Layer 12
-
418Layer 13
-
179Layer 16
-
400Layer 19
-
7937Layer 20
-
24Covered Tiles
-
0Dustblocks
-
24Filthy Surfaces
-
0Spiked Surfaces
-
92Enemy Dust
-
116Total Dust
-
4Ball, Spring
-
6Barrel, Slime
-
4Beast, Slime
-
6Ball, Slime
-
10634Layer 6
-
860Layer 11
-
2289Layer 16
-
14604Layer 19
-
336Covered Tiles
-
0Dustblocks
-
152Filthy Surfaces
-
187Spiked Surfaces
-
39Enemy Dust
-
191Total Dust
-
2Beast, Slime
-
7Ball, Slime
-
4891Layer 6
-
3512Layer 7
-
1426Layer 16
-
16Layer 17
-
19141Layer 19
-
197Covered Tiles
-
0Dustblocks
-
199Filthy Surfaces
-
0Spiked Surfaces
-
24Enemy Dust
-
223Total Dust
-
3Ball, Spring
-
3Ball, Slime
-
16406Layer 6
-
1292Layer 7
-
3525Layer 11
-
119Layer 12
-
1654Layer 16
-
4814Layer 19
-
20072Layer 20
-
787Covered Tiles
-
82Dustblocks
-
85Filthy Surfaces
-
724Spiked Surfaces
-
104Enemy Dust
-
271Total Dust
-
4Ball, Spring
-
2Barrel, Slime
-
2Beast, Slime
-
20Ball, Slime
-
15523Layer 6
-
3966Layer 8
-
25519Layer 10
-
6707Layer 12
-
82Layer 13
-
50Layer 14
-
4627Layer 15
-
255Layer 16
-
2033Layer 17
-
5394Layer 19
-
915Covered Tiles
-
0Dustblocks
-
221Filthy Surfaces
-
710Spiked Surfaces
-
66Enemy Dust
-
287Total Dust
-
22Ball, Slime
-
63906Layer 6
-
5402Layer 8
-
5677Layer 9
-
1198Layer 12
-
648Layer 13
-
304Layer 15
-
4019Layer 16
-
41868Layer 19
-
276Covered Tiles
-
114Dustblocks
-
84Filthy Surfaces
-
202Spiked Surfaces
-
75Enemy Dust
-
273Total Dust
-
3Beast, Slime
-
16Ball, Slime
-
163480Layer 6
-
1630Layer 7
-
2472Layer 8
-
131Layer 9
-
6202Layer 10
-
1168Layer 11
-
1196Layer 13
-
408Layer 14
-
38Layer 15
-
4118Layer 16
-
489Layer 17
-
7150Layer 19
-
508Covered Tiles
-
54Dustblocks
-
197Filthy Surfaces
-
319Spiked Surfaces
-
84Enemy Dust
-
335Total Dust
-
3Ball, Spring
-
2Beast, Slime
-
17Ball, Slime
Difficults
-
1204Layer 6
-
588Layer 8
-
886Layer 14
-
1116Layer 16
-
717Layer 19
-
517Covered Tiles
-
35Dustblocks
-
27Filthy Surfaces
-
915Spiked Surfaces
-
14Enemy Dust
-
76Total Dust
-
8Square
-
6Hexagon
-
3827Layer 6
-
5473Layer 7
-
3121Layer 8
-
395Layer 11
-
419Layer 16
-
1158Layer 19
-
960Covered Tiles
-
71Dustblocks
-
66Filthy Surfaces
-
921Spiked Surfaces
-
35Enemy Dust
-
172Total Dust
-
22Square
-
13Hexagon
-
940Layer 6
-
1557Layer 8
-
1488Layer 11
-
1402Layer 19
-
792Covered Tiles
-
62Dustblocks
-
90Filthy Surfaces
-
1002Spiked Surfaces
-
37Enemy Dust
-
189Total Dust
-
24Square
-
13Hexagon
-
32909Layer 6
-
1081Layer 8
-
30228Layer 10
-
112Layer 13
-
738Layer 14
-
1478Layer 16
-
26011Layer 19
-
684Covered Tiles
-
143Dustblocks
-
3Filthy Surfaces
-
984Spiked Surfaces
-
32Enemy Dust
-
178Total Dust
-
25Square
-
7Hexagon
-
1977Layer 11
-
17555Layer 16
-
541Layer 19
-
275Covered Tiles
-
115Dustblocks
-
0Filthy Surfaces
-
320Spiked Surfaces
-
6Enemy Dust
-
121Total Dust
-
2Square
-
4Hexagon
-
485Layer 10
-
466Layer 11
-
379Layer 16
-
389Layer 19
-
328Covered Tiles
-
18Dustblocks
-
0Filthy Surfaces
-
667Spiked Surfaces
-
44Enemy Dust
-
62Total Dust
-
38Square
-
6Hexagon
-
13050Layer 8
-
4407Layer 16
-
2194Layer 19
-
834Covered Tiles
-
151Dustblocks
-
193Filthy Surfaces
-
660Spiked Surfaces
-
10Enemy Dust
-
354Total Dust
-
4Square
-
6Hexagon
-
68448Layer 6
-
780Layer 14
-
5567Layer 16
-
5117Layer 19
-
2733Covered Tiles
-
232Dustblocks
-
211Filthy Surfaces
-
2999Spiked Surfaces
-
135Enemy Dust
-
578Total Dust
-
106Square
-
29Hexagon
Enemies
Forest
Bear

-
Can attack and break your combo
-
Attacks when entering field of view
-
Can be given a path in the editor
-
Paths 'attached' to the ground
-
Attacks do not move it
-
Can be placed in the editor
-
Health: 9
Attacks with a single hitbox in the direction it is facing.
Forest variant of the Golem style enemy.
Critter

-
Can't hurt
-
Can be given a path in the editor
-
Movable with attacks
-
Can be placed in the editor
-
Health: 3
Forest variant of the Small Gargoyle
Commonly referred to as a Turkey.
Hawk

-
Can attack and break your combo
-
Attacks when entering field of view
-
Does not change behavior when attacked (excluding hitstun)
-
Can be given a path in the editor
-
Considers ground as walls when pathing
-
Movable with attacks
-
Not in the editor entity list
-
Health: 3
A mostly complete entity present in the game files that was not used in the completed game.
Despite not being able to place it from the level editor in vanilla Dustforce, Dustmod will list it.
When it initiates an attack, the hawk will be attracted towards your mouse cursor. This may cause desyncs if you are not using Dustmod, as the standard replay format does not record mouse position.
Porcupine

-
Can attack and break your combo
-
Attacks when entering field of view
-
Spawns additional enemies that will hurt you
-
Shoots spike
-
Can be given a path in the editor
-
Paths 'attached' to the ground
-
Can be placed in the editor
-
Health: 1
Attacks by spawning three quills, directed forward and diagonally forward from the surface it is on.
Behaves strangely when not on a surface. If placed in the air, it will remain static and unable to attack. If it is removed from a surface while moving, bugs may occur as seen in 4 Lexie
Spike

-
Can attack and break your combo
-
Spawned by porcupine
-
Movable with attacks
-
Not in the editor entity list
-
Unkillable via conventional means
Can be hit and redirected by entities on the opposing “team” to the previous owner. The entity that hits it becomes the new owner. Once redirected by the player with an attack, it can hit other enemies for 100 (!) damage, as demonstrated in top Wild Den replays.
This can also be used for quill passing as seen in Redirection
Commonly referred to as a Quill.
Stoneboss

-
Can attack and break your combo
-
Attacks when entering field of view
-
Can be given a path in the editor
-
Paths 'attached' to the ground
-
Attacks do not move it
-
Can be placed in the editor
-
Health: 12
Attacks by falling on the enemy. Has an active hitbox as long as it is falling during its attack, which allows the player to farm super quickly as demonstrated in top Overgrown Temple Any% replays.
Can be lured outside of its path.
Commonly referred to as a Large Totem.
Stonebro

-
Can attack and break your combo
-
Attacks when entering field of view
-
Can be given a path in the editor
-
Paths 'attached' to the ground
-
Movable with attacks
-
Can be placed in the editor
-
Health: 3
Has an active hitbox as long as it is moving at a speed of 400 units per second or higher.
When grounded, it will accelerate up to its max speed at 16.666 u/s/s, unless it is perfectly motionless, then it will accelerate at 26.666 u/s/s for a single frame. Its ground speed is capped at 400 u/s.
When airborne, it will accelerate due to gravity at 16.666 u/s/s.
When colliding with a wall, it will perform an elastic collision, reflecting its speed vector according to the angle of the wall.
Can be lured outside of its path, but will return once aggro is lost.
Commonly referred to as a Small Totem.
Wolf

-
Can attack and break your combo
-
Attacks when entering field of view
-
Can be given a path in the editor
-
Paths 'attached' to the ground
-
Movable with attacks
-
Can be placed in the editor
-
Health: 5
Its attack is performed by “lunging” at the player. Hitting them interrupts their attack.
When out of range to lunge, they will accelerate to a very high top speed until close enough to attack. If they are in mid-air at this point, they can still lunge while falling.
Commonly referred to as Fox or Wolf interchangeably.
Mansion
Book

-
Can attack and break your combo
-
Attacks when entering field of view
-
Can be given a path in the editor
-
Movable with attacks
-
Can be placed in the editor
-
Health: 3
Will fall to a fixed maximum distance, or until it makes contact with an enemy when attacking. It will then return to a point on its path before it can attack again.
Butler

-
Can't hurt
-
Can be given a path in the editor
-
Paths 'attached' to the ground
-
Can be placed in the editor
-
Health: 1
Similar to the enemy Maid, but has a faster movement speed, and a smaller hitbox.
Chest, Scrolls

-
Can attack and break your combo
-
Attacks when entering field of view
-
Spawns additional enemies that will hurt you
-
Shoots scrolls
-
Can not be given and/or will not obey a path
-
Movable with attacks
-
Can be placed in the editor
-
Health: 9
Spawns a single scroll when attacking.
Acts similarly to the Treasure Chest
Chest, Treasure

-
Can attack and break your combo
-
Attacks when entering field of view
-
Spawns additional enemies that will hurt you
-
Shoots treasure
-
Can not be given and/or will not obey a path
-
Movable with attacks
-
Can be placed in the editor
-
Health: 9
Spawns three random treasures when attacking.
Acts similarly to the Scroll Chest
Commonly referred to as a Gold Chest.
Flag

-
Can't hurt
-
Can not be given and/or will not obey a path
-
Attacks do not move it
-
Can be placed in the editor
-
Health: 5
Always spreads dust upwards when killed.
Its hitbox is much smaller than its sprite.
Gargoyle, Big

-
Can attack and break your combo
-
Attacks when entering field of view
-
Can be given a path in the editor
-
Paths 'attached' to the ground
-
Movable with attacks
-
Can be placed in the editor
-
Health: 5
Due to the long startup of their attack, can commonly cause “Ghost punches” to occur, where the attack hitbox becomes active after they have already died.
Commonly referred to as a Ground Gargoyle, or just Gargoyle.
Gargoyle, Small

-
Can't hurt
-
Can be given a path in the editor
-
Movable with attacks
-
Can be placed in the editor
-
Health: 3
Will deviate slightly from their path by bobbing up and down. This can lead to strategies that only work at certain points in their Bob cycle.
Commonly referred to as a Flying Gargoyle, or just Gargoyle.
Knight

-
Can attack and break your combo
-
Attacks when entering field of view
-
Can be given a path in the editor
-
Paths 'attached' to the ground
-
May block from some or all directions
-
Movable with attacks
-
Can be placed in the editor
-
Health: 9
Has a shield that blocks incoming attacks from the front when it is grounded. Attacking this shield does not give hitrise, but instead stalls the players vertical momentum. It also rewards double the combo progress of most attacks (2 combo per light, 6 combo per heavy).
When they see an enemy, they will try to move into a position a swords length away before attacking. This can be used to lure them away from their path as seen on this Ramparts replay.
Maid

-
Can't hurt
-
Can be given a path in the editor
-
Paths 'attached' to the ground
-
Can be placed in the editor
-
Health: 1
Similar to the enemy Butler, but has a slower movement speed, and a larger hitbox.
Scrolls

-
Can attack and break your combo
-
Attacks when entering field of view
-
Spawned by chest-scrolls
-
Can not be given and/or will not obey a path
-
Can be placed in the editor
-
Health: 1
Behaves like Treasure. Will stay idle at its spawn position until an enemy enters its radius, at which point it will fly in a straight line to the position the enemy was seen until it hits the enemy or a surface.
Can be prevented from firing or frozen mid-flight using a Super Cancel.
Treasure

-
Can attack and break your combo
-
Attacks when entering field of view
-
Spawned by chest-treasure
-
Can not be given and/or will not obey a path
-
Can be placed in the editor
-
Health: 1
Behaves like Scrolls. Will stay idle at its spawn position until an enemy enters its radius, at which point it will fly in a straight line to the position the enemy was seen until it hits the enemy or a surface.
Can be prevented from firing or frozen mid-flight using a Super Cancel.
City
Bag, Trash

-
Can attack and break your combo
-
Attacks when entering field of view
-
Spawned by can-trash
-
Not in the editor entity list
-
Health: 1
Does not reward any combo when hit by a heavy attack, however it still returns any air charges. This can be abused to avoid starting the combo timer in maps such as Garbage Day.
Ball, Trash

-
Can't hurt
-
Can be given a path in the editor
-
Considers ground as walls when pathing
-
Movable with attacks
-
Can be placed in the editor
-
Health: 3
City variant of the Small Gargoyle
Commonly referred to as a Trash Turkey.
Beast, Trash

-
Can attack and break your combo
-
Attacks when entering field of view
-
Can be given a path in the editor
-
Paths 'attached' to the ground
-
Attacks do not move it
-
Can be placed in the editor
-
Health: 9
Attacks with a single large hitbox in the direction it is facing.
City variant of the Golem style enemy.
Commonly referred to as a Trash Golem.
Can, Trash

-
Can attack and break your combo
-
Attacks when entering field of view
-
Spawns additional enemies that will hurt you
-
Shoots bag-trash
-
Can not be given and/or will not obey a path
-
Movable with attacks
-
Can be placed in the editor
-
Health: 9
When attacking, it spawns three Trash bags in sequence before entering a cooldown period before it can attack again.
With good timing, a player can dash through it between the trash bags being fired without getting hit.
Tire

-
Can attack and break your combo
-
Attacks when entering field of view
-
Changes behavior on player attack
-
Can not be given and/or will not obey a path
-
Movable with attacks
-
Can be placed in the editor
-
Health: 3
This enemy bounces around like a rubber ball, preserving its momentum and redirecting its velocity when it hits a surface, or is hit by an attack. When dropped from a large height it can move much faster than the player. It has an active hitbox at all times.
Can be frozen using a Super Cancel.
Lab
Ball, Slime

-
Can't hurt
-
Can be given a path in the editor
-
Considers ground as walls when pathing
-
Movable with attacks
-
Can be placed in the editor
-
Health: 3
Lab variant of the Small Gargoyle
Commonly referred to as a Slime Blob.
Ball, Spring

-
Can attack and break your combo
-
Does not attack offensively
-
Changes behavior on player attack
-
Can not be given and/or will not obey a path
-
Attacks do not move it
-
Can be placed in the editor
-
Health: 5
While this enemy traditionally has 5 health, you can “snap the stem” by attacking away from the surface it is on, then in a perpendicular direction of the stretch in quick succession. This means it effectively only has 2 HP if you can use this technique properly. If not killed during the stretch, the blob will snap back and create a large hitbox.
During the recoil animation, they have some invulnerability frames where the player may attack them to build combo without dealing damage. This can be abused in maps such as Slime Invulnerability.
Commonly referred to as a Spring Blob, or a Rooted Slime Blob.
Barrel, Slime

-
Can attack and break your combo
-
Attacks when entering field of view
-
Can be given a path in the editor
-
Considers ground as walls when pathing
-
Movable with attacks
-
Can be placed in the editor
-
Health: 3
Attacks passively every 56 frames, unless interrupted by an attack.
Bobs on its path similarly to a Small Gargoyle.
Commonly referred to as a Paintcan.
Beast, Slime

-
Can attack and break your combo
-
Attacks when entering field of view
-
Can be given a path in the editor
-
Paths 'attached' to the ground
-
Attacks do not move it
-
Can be placed in the editor
-
Health: 9
Attacks with six small hitboxes travelling forward in the direction it’s facing.
Lab variant of the Golem style enemy.
Commonly referred to as a Slime Golem.
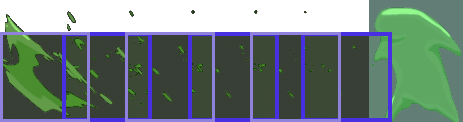
Generic
Apple

-
Can't hurt
-
Movable with attacks
-
Can be placed in the editor
-
Unkillable via conventional means
Door

-
Can't hurt
-
Can not be given and/or will not obey a path
-
Attacks do not move it
-
Can be placed in the editor
-
Unkillable via conventional means
Behaves like solid blocks, and snaps to the tile grid. Cannot be removed unless its associated Key is killed.
Can be used to farm super.
Placing this in the map editor will spawn an associated key and will “select” the key, making any pathing nodes placed affect the key rather than the door.
Hexagon

-
Can't hurt
-
Can be given a path in the editor
-
Considers ground as walls when pathing
-
May block from some or all directions
-
Attacks do not move it
-
Can be placed in the editor
-
Health: 3
This enemy can only be destroyed by hitting it with a heavy attack.
Light attacks will reward 2 combo, but will not deal any damage, and will not grant any Hitrise. However, light attacks will stall the players vertical momentum, allowing them to hover while attacking repeatedly.
Supering this entity will reward only 1 combo.
Commonly referred to as a Heavy Prism.
Key

-
Can't hurt
-
Can be given a path in the editor
-
Can be placed in the editor
-
Health: 1
When killed, will fly to its associated Door and unlock it, causing the door to open so that entities may pass through.
Bobs on its path similarly to a Small Gargoyle.
Square

-
Can't hurt
-
Can be given a path in the editor
-
Considers ground as walls when pathing
-
Can be placed in the editor
-
Health: 1
A stationary floating enemy. Commonly used in precise air control maps as it is the only flying enemy that does not bob up and down.
Commonly referred to as a Light Prism.